

In this article, we’ll break down how our crypto payment gateway, which processes millions of dollars a month, works.
We’ll reveal the exact trick we use to process unlimited payments on the Lightning Network without touching a single node or rebalancing channels.
We’ll also dive into how we enable a gasless wallet on EVM networks to move several tokens in a single transaction, explain concepts about the Solana blockchain that very few people know, and how we manage to save up to 70% on fees on the Tron blockchain, a blockchain with a very controversial founder that went from being one of the cheapest on the market to one of the most expensive.
A crypto payment looks simple from the user’s side: select a token, send funds, and wait for confirmation. Behind that flow, our payment gateway has to coordinate pricing, wallet allocation, blockchain monitoring, and fund movement across multiple chains.
At Zeno Bank, we process thousands of payments every day across networks like Ethereum, Solana, Tron, and Bitcoin. This article breaks down the architecture behind that system and how payments move from checkout creation to final fund distribution.
Checkout Creation
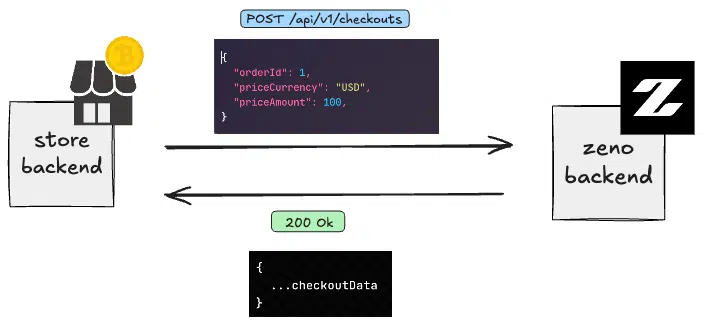
Every payment starts when a merchant creates a checkout through the Zeno Bank API (POST /api/v1/checkouts), sending us the fiat amount and their own orderId.
That orderId is what ties Zeno Bank to the merchant’s system. Every webhook we send back includes it, so the store can match up payments, update order statuses, and keep track of everything on their side.
Merchants can create a checkout either by interacting directly with our API or by using our plug-and-play integrations, such as our WooCommerce Plugin and PrestaShop Module, which handle the API communication internally
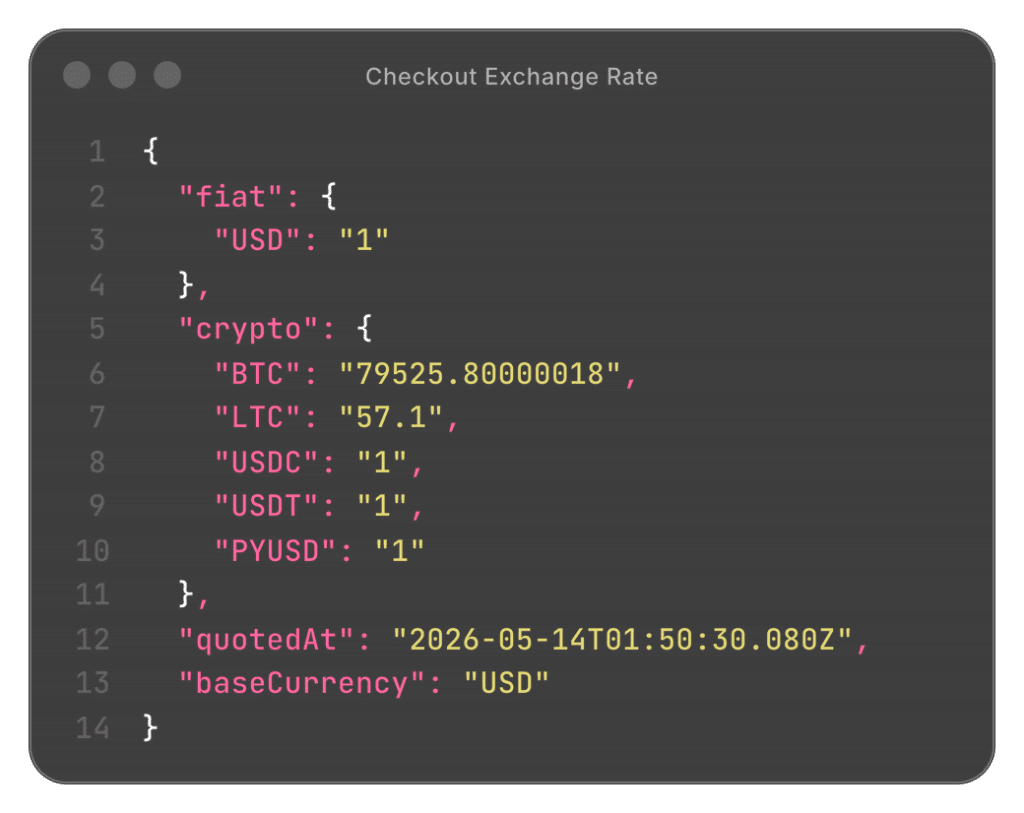
When a checkout is created, our system also fetches live crypto prices and saves a snapshot of these rates in the database. This unique rate is tied directly to the newly created checkout and will be used to handle all token conversions.
For example, if a store creates a checkout for 100 USD and the customer wants to pay in Bitcoin, we use this saved rate to calculate the exact amount of BTC required.
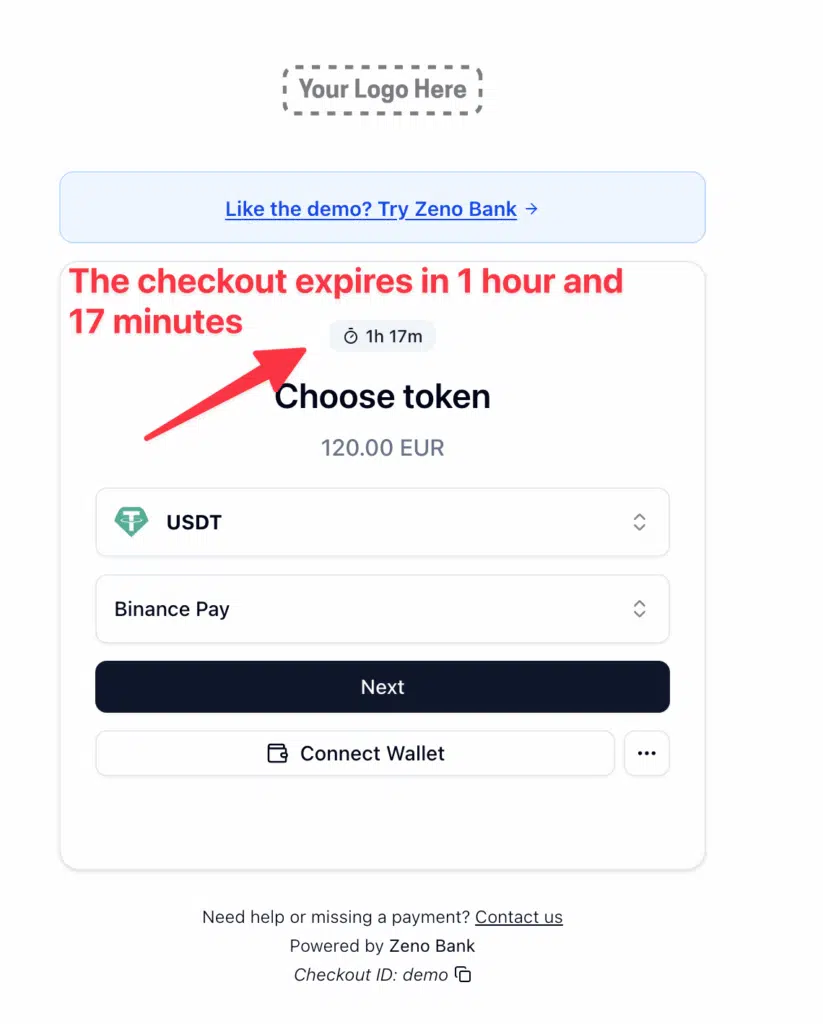
Because crypto prices are volatile, we refresh this rate every hour for checkouts that are currently open. Without these regular updates, stale rates create a major vulnerability. For instance, if Bitcoin’s market price drops significantly below the checkout rate, a user could exploit the difference by paying with cheaper tokens bought elsewhere, causing a substantial financial loss for the store.
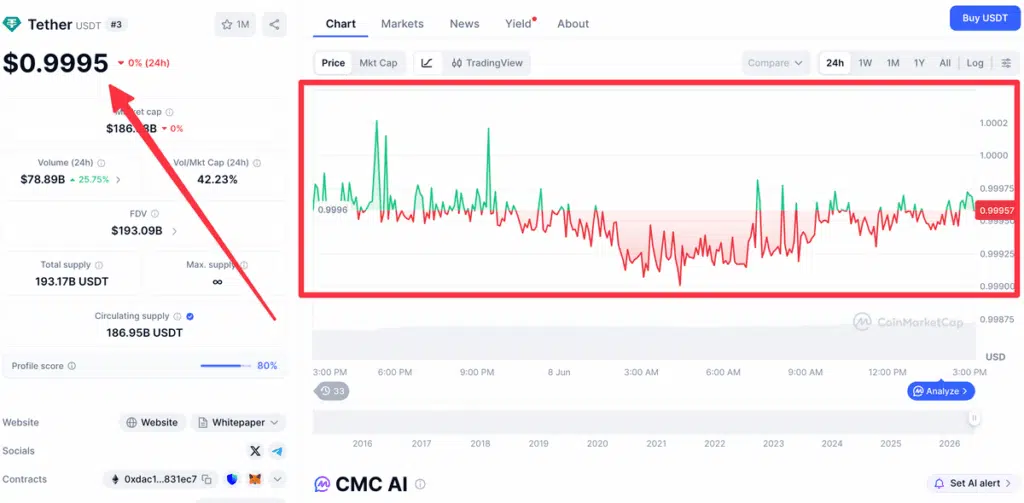
Stablecoin prices against fiat are rarely a perfect 1:1 ratio due to minor market fluctuations.
To ensure a more user-friendly experience, if a stablecoin fluctuates by less than 1% from its peg, our system automatically rounds the exchange rate to a flat 1:1.
For example, in this screenshot, even though USDT is at $0.9995, our system automatically rounds its price to $1.
Token Selection and Intermediary Wallet Assignment
After picking a payment token and network, the user clicks Next, and the gateway shows the destination wallet address and the exact amount to send.
To calculate how many tokens the user needs to send and show it to them, we convert the payment amount using the exchange-rate snapshot saved for that checkout
The wallet address is where crypto differs from a normal payment gateway.
Unlike traditional gateways, where every transaction ties back to a specific identity or bank account, the blockchain is pseudonymous, when a payment lands, all you see is a wallet address and an amount. Nothing reveals who actually sent the funds.
That creates a problem: if several customers pay into the same merchant wallet, there’s no built-in way to tell their transactions apart. So our system needed a reliable way to match each incoming payment to the checkout it belongs to.
In the early versions of our crypto payment gateway, every purchase from a store went to one shared wallet. To tell them apart, we gave each customer a slightly different total.
Say a store sold tickets to a crypto event for $120. Every buyer sent tokens to the same wallet, but with a unique decimal amount: one checkout might show 120.0343 USDT, the next 120.041 USDT. The backend used those tiny differences to tell which payment belonged to which checkout.
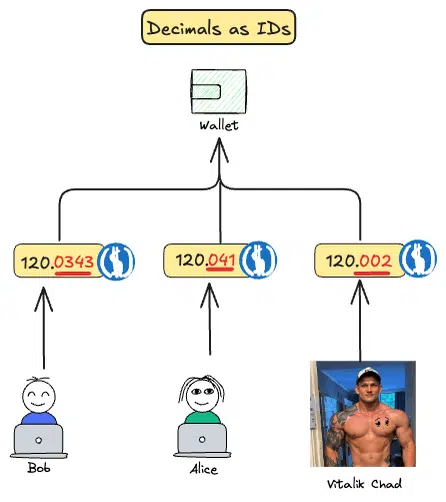
Since all funds arrived at the exact same wallet, we didn’t have to worry about moving them around or managing separate wallet addresses. This approach allowed us to launch much faster.
But users frequently sent the wrong amount, rounded decimals incorrectly, or ignored the exact value shown on the checkout page. Even small mismatches prevent the backend from identifying the payment correctly. This led to failed detections, manual reviews, and a large number of support tickets.
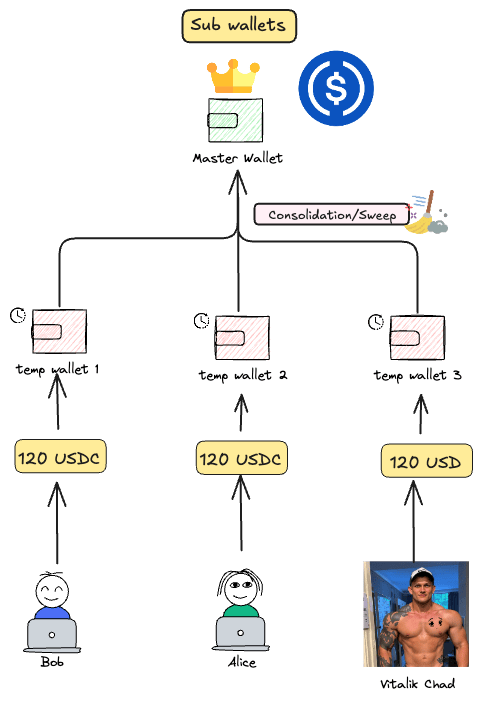
To remove that ambiguity, we moved to a model based on intermediary wallets. Each intermediary wallet is assigned to a single checkout at a time, and any funds that arrive while it’s assigned are counted as payment for that checkout. Later, we move these funds to a master wallet.
Once the checkout is completed or expires, some of these wallets are reused while others are used only once, depending on the network.
Each intermediary wallet can be in one of the following states:
- available: ready to be assigned to a new checkout
- in_use: currently assigned to an active checkout
- cooldown: temporarily unavailable after checkout expiration or completion
- quarantined: removed from rotation for manual review
- archived: permanently retired from the system and no longer used for new checkouts
The cooldown state exists to handle delayed payments. Some users send funds from centralized exchanges, where withdrawals can be delayed by several minutes or more.
Without a cooldown period, a wallet from an expired checkout could be reassigned to another user right away, creating the risk that a delayed transfer is credited to the wrong payment session.
Payment Detection Architecture
After a user sends a payment, our system must detect the transaction.
Doing this internally requires scanning every block and transaction across all supported blockchains to see if our wallets are involved.
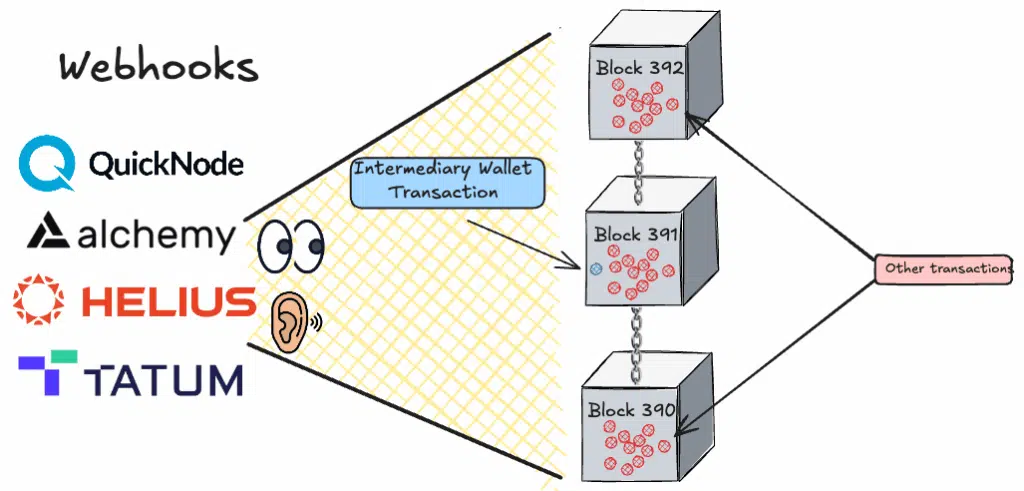
Luckily, Web3 providers like Alchemy, Helius, and QuickNode handle this complexity through wallet activity webhooks. These are a special type of webhook that triggers whenever a blockchain transaction involves any of our tracked addresses.
We configure them to monitor our pool of intermediary addresses, and the moment funds arrive, the provider sends a webhook event directly to our backend.
However, detecting a payment is only the first step. It does not mean the payment is valid yet because we have to watch out for blockchain reorgs.
A reorg happens when the blockchain temporarily forks. While it often occurs because two blocks are produced at the exact same time, it can also be caused by network latency, software bugs, or a 51% attack.
When two valid blocks appear at the same time, the network has to pick one. Over the next few blocks, the nodes follow a shared rule to decide which chain is the “real” one, usually the longest one. They keep that chain and throw away the blocks from the side that lost.
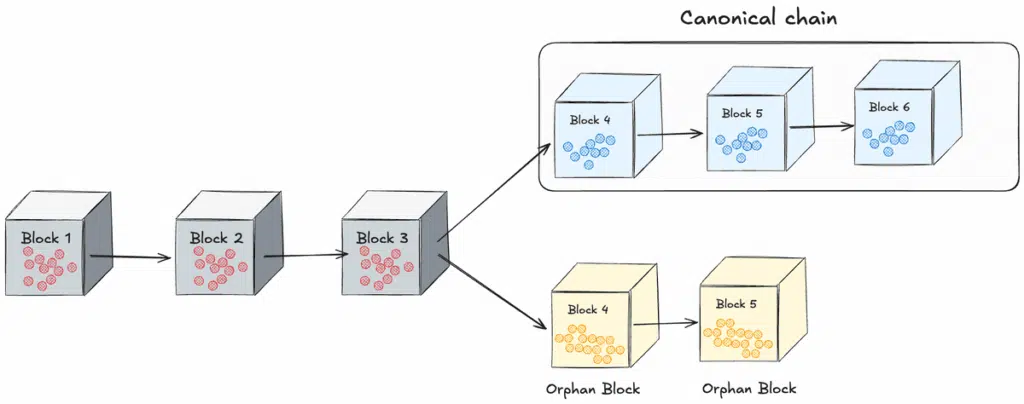
As the diagram shows, the chain splits after Block 3 into two competing chains of equal length, the blue one and the yellow one. Both have their own Block 4 and Block 5, so for a short moment the network is split: some nodes follow the blue chain, while others follow the yellow one.
The tie breaks once Block 6 is mined on the blue chain. That makes the blue chain longer, so the whole network adopts it as the canonical chain. This triggers a reorg, and the yellow Block 4 and Block 5 become orphan blocks.
If a blockchain transaction was included only in a yellow block and never made it into a blue one, there’s a problem. For a short time, the nodes following the yellow chain saw it as valid, while the nodes following the blue chain never knew about it.
Once the reorg happens and the yellow blocks are orphaned, that transaction vanishes along with them, as if it never happened.
This is why we wait for several blocks before confirming a payment. If we confirmed right away, a reorg could orphan the block our transaction was in and make the payment disappear, leaving us thinking we got paid when we didn’t. The longer we wait, the safer the confirmation, but the longer the user has to wait to see that the payment has been completed, so it’s a trade-off between speed and security.
This is exactly why when you deposit funds into an exchange like Binance, you have to wait for a certain number of blocks to pass before the money shows up in your account.
Reorgs are mostly a concern for Proof of Work networks and are rare on Proof of Stake networks or Layers 2.
Regardless of the network, our system always waits for a specific number of block confirmations before treating a payment as valid.
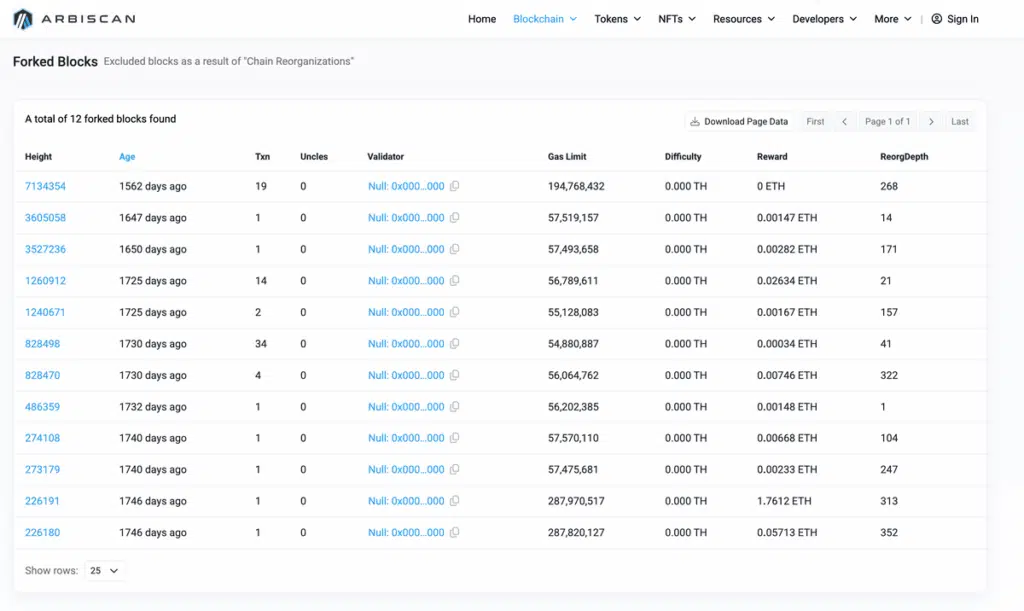
This screenshot from Arbiscan shows the history of forked blocks on Arbitrum (an Ethereum Layer 2). The last reorg happened years ago.
Payment Accounting and Validation
Each checkout has a paidAmount counter that goes up whenever a valid payment arrives in the assigned intermediary wallet.
Instead of looking for a single transaction that matches the exact price, our system tracks the total amount received.
When a token arrives, the backend uses the saved exchange rate from the checkout to convert the crypto into the checkout’s fiat currency. That amount is then added to the counter.
For example, if a checkout total is $100 and the user sends 30 PYUSD on Solana, those 30 PYUSD are worth $30 (at a 1:1 ratio).
The paidAmount counter goes up to 30. The user then just needs to send another $70 worth of tokens to complete the payment.
This system enables multi-payments, letting a user pay for a single checkout with multiple tokens across multiple blockchains.
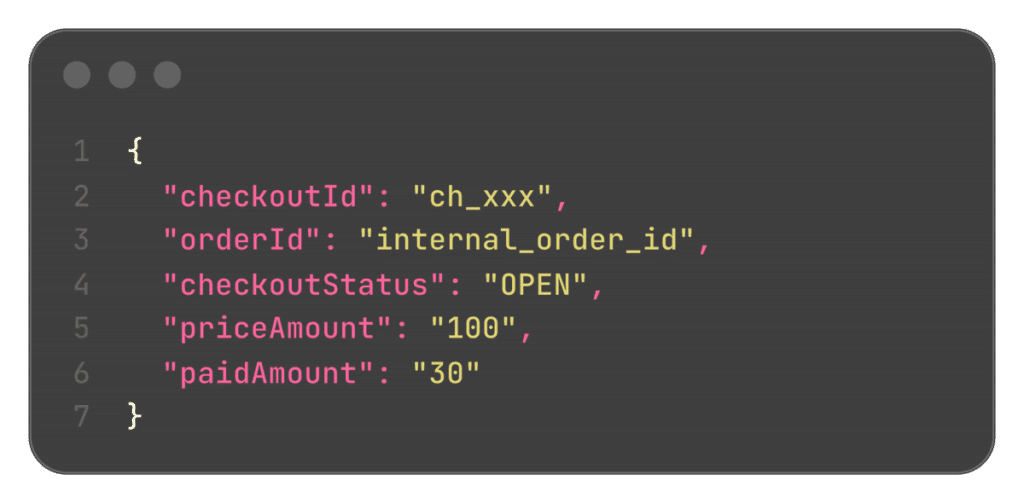
A checkout is marked as completed when the paidAmount is greater than or equal to the total price (priceAmount).
We also allow a tiny price difference so transactions don’t fail over just a cent. For example, if the checkout total is $100 and the user sends $99.99, the system will still mark it as fully paid.
Each wallet is linked to only one active checkout, so any supported token sent to that address counts toward the total. If a user chooses USDT but sends USDC, the system processes it anyway. This automatically fixes user mistakes and reduces support tickets.
If a user sends a completely unsupported token, like USDC.e on Arbitrum, the system won’t process it automatically.
But the money isn’t lost. The user can contact support, and we will manually check the transaction, convert the funds, and credit the store.
Each checkout has an expiration time, and users must send the funds before the countdown hits zero.
If a checkout isn’t fully paid by then, its status changes:
- If the paid amount is 0, it’s marked as expired.
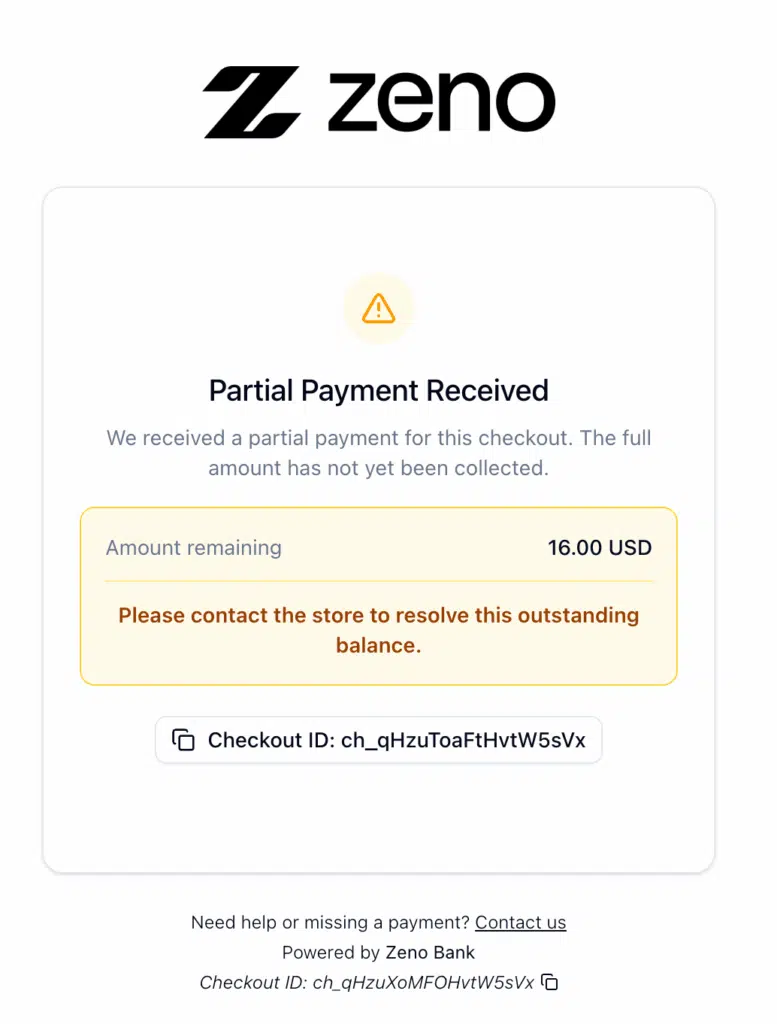
- If the paid amount is greater than 0 but less than the total, it becomes partially paid.
If the checkout is marked as partially paid, we send a notification to the store and also forward the funds to them, so they can decide how to act.
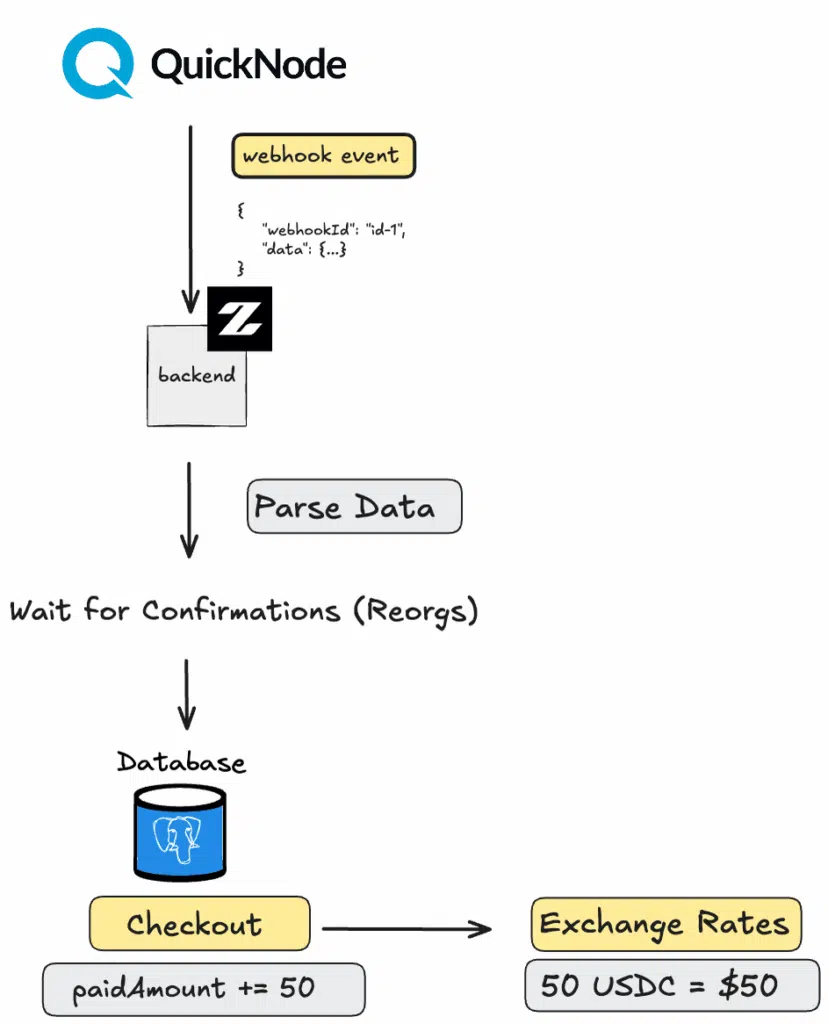
So, in summary, this is the architecture we use to confirm payments. The flow works like this:
- First, we receive the webhooks.
- We parse the data into a format our backend can work with.
- We wait before considering the transaction valid.
- We find the checkout linked to the wallet that received the funds.
- We credit the amount to the checkout.
Fund Consolidation Architecture
Once a checkout is marked as completed or partially paid, we start the fund consolidation process. This means we have to move the funds from the intermediate wallets to the master wallet. This process of moving the funds is known as consolidation or sweeping.
In our system, this master wallet changes based on the option the user chooses. The first mode is “managed”, where the master wallet is a custodial wallet we manage for the user. The second is called “bring your own” or non-custodial, where the master wallet is the user’s own wallet that we do not control.
The main problem we face here is that moving funds to the master wallet requires a blockchain transaction, meaning the intermediate wallet must pay network fees using the native gas token.
The issue is that the intermediate wallet doesn’t have any of the native token, it only holds the tokens the user sent to pay the checkout.
Normally, the standard process looks like this: you send the native token used to pay blockchain fees (like ETH on Ethereum) to the intermediate wallet, and from there it can cover the gas cost of forwarding the funds to the master wallet.
This is actually the same approach centralized exchanges like Binance use. When you deposit a token into your exchange account, the funds first land in a unique deposit address assigned to you. The exchange then “sweeps” those funds into its own exchange master wallet and credits the equivalent amount to your account balance.
To move the funds out of that deposit address, the exchange first sends a small amount of the native gas token to cover the transaction fee, then performs the sweep.
In our case, if we followed this same approach, apart from sending the native fuel to the intermediate wallet, we would then have to execute 2 transactions from that wallet: one to send the 0.1% service fee, and another to send the rest to the user’s master wallet.
That’s three different transactions just to sweep one payment.
The main issue here is orchestration. Coordinating all these steps is a headache.
What happens if the network suddenly gets congested and gas prices spike right after you send the ETH to pay for the blockchain fees?
Or what if the transfer to the master wallet works but the fee transaction fails?
In short, the fewer transactions, the better. At Zeno Bank, we handle this differently, choosing the most efficient method for each blockchain
EVM Consolidation with EIP-7702
When we talk about EVM, we mean all blockchains compatible with the Ethereum Virtual Machine, Ethereum and its Layer 2s like Base, Arbitrum, BNB Chain, and so on.
On these chains, our intermediate wallets hold the tokens the user sent (like USDT), but they don’t hold the native token (like ETH on Ethereum or BNB on BNB Chain) needed to pay gas. So the core question is: how do we move those tokens out without the wallet owning any gas?
Some background on EVM accounts
Ethereum has two types of accounts:
- Externally Owned Accounts (EOAs): controlled by a private key.
- Smart Contracts: code deployed directly on-chain.
Two rules matter here:
- Every transaction must be initiated by an EOA, and that EOA pays the gas.
- When an EOA interacts directly with a token contract (e.g. the USDT contract), it can only perform one transfer per transaction. (To send a token you call transferFrom() on the token’s smart contract.)
That second rule is the real limitation. To sweep a payment, we need to make several transfers in a single transaction: send the 0.1% service fee, and send the remaining funds to the user’s master wallet.
A plain EOA hits the one-transfer-per-transaction limit. If we want to move the funds in a single transaction (fee and sweep together), it looks like our intermediate wallets have no choice but to be smart contracts
The problem is scale. We manage millions of intermediate wallets, so this would mean deploying millions of contracts on-chain. There are ways to make it lighter. We could use EIP-1167 Minimal Proxies to keep each contract tiny, rely on a factory contract to deploy many at once, or use CREATE2 to precompute addresses and only deploy a contract once its wallet actually receives funds. Even so, none of these approaches fully removes the overhead.
The clean solution: EIP-7702
The killer feature of EIP-7702 is that you can convert an EOA into a smart contract and call that contract within the very same transaction. This simplifies everything, because we can spin up thousands of new intermediate wallets as plain EOAs and, whenever we need to sweep their funds, turn them into smart contracts and run the transferFrom batch on the fly, all in one transaction.
It works by adding a new type of transaction that lets an EOA temporarily take on smart contract behavior. You simply point your wallet to an implementation contract (which just needs to already be deployed on-chain).
It behaves a lot like a proxy pattern, so whenever you update the EIP-7702 implementation smart contract that the wallet points to, you have to handle the storage layout and state variables carefully (otherwise you risk corrupting the wallet’s data).
To enable EIP-7702, the EOA signs an authorization off-chain, which is then included in the transaction. (This, by the way, is one of the keys to account abstraction.) That’s exactly how we move funds on EVM chains in a single transaction.
Our EIP-7702 architecture
Our setup relies on two contracts. The first is pure logic, the implementation contract that the intermediate wallets point to via EIP-7702. It holds no state of its own; instead, it calls a separate authorization contract to check permissions. This way, every implementation contract reads from the same source of truth,
This authorization contract is the one that manages access: it holds the state of which addresses are allowed to interact with the EIP-7702 implementation contract’s functions.
The whole process is orchestrated in a single transaction by a dedicated sponsor EOA wallet we call the Gas Tanker, whose address is registered as authorized in the authorization contract.
- First time a wallet is used: the Gas Tanker takes the wallet’s off-chain signature, uses it to turn the EOA into a smart contract, and calls a function on that contract to sweep all the tokens, all in one transaction.
- Every time after that: the Gas Tanker runs the exact same transaction, but without the off-chain signature, since the wallet is already linked to the implementation contract.
The best part is that the Gas Tanker sends the transaction and covers the gas, so the intermediate wallet never needs to hold any native token of its own.
Here is a screenshot of how one of our intermediate wallets looks on BscScan, highlighting the EIP-7702 details:
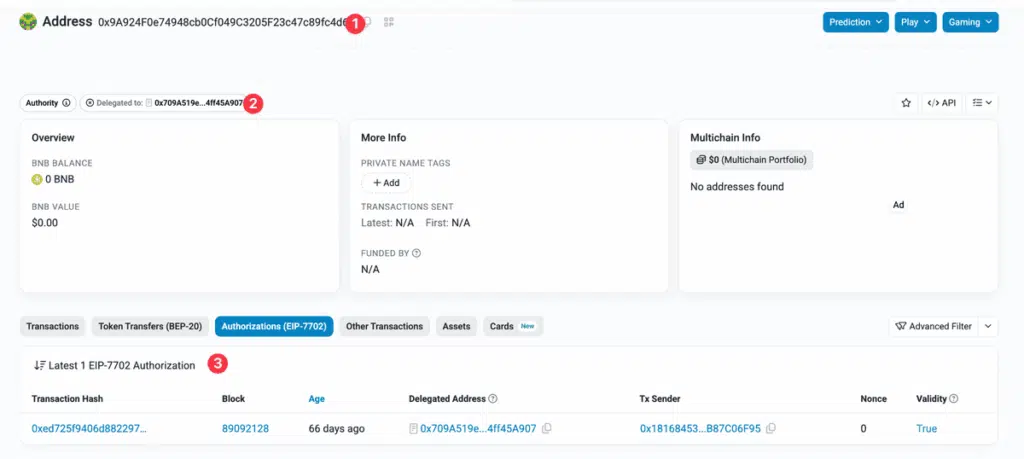
- (1) Wallet Address: The address of the intermediate wallet. It functions as a standard EOA but now has the ability to run smart contract logic.
- (2) Implementation Contract Address: The contract address the wallet points to via EIP-7702. This contract contains the logic required to execute the batchCall() function.
- (3) Authorization History: The log of EIP-7702 authorizations. If we ever change the implementation contract in the future, all updates will be reflected here.
Solana Consolidation
Solana works in a completely different way compared to EVM networks.
In Ethereum, a transaction can only interact with a single contract at a time. If we want to move multiple tokens in a single transaction, we have to use a smart contract.
In Solana, this can be done natively. Transactions on this network are like a list where you can include multiple smart contract function calls (in Solana, smart contracts are called Programs), and each of these function calls is known as an instruction.
Imagine you have two different wallets in Phantom and both have 100 USDC.
In Solana, you can move the funds from both wallets at the same time in a single transaction. To do this, you include two “transfer USDC” instructions in the transaction (one instruction for each wallet). Since you are moving funds from two different wallets, that transaction will require two signatures (one from each wallet).
Additionally, in Solana, you can define which wallet pays for the transaction gas. In the smat transaction, there can be a third wallet that is solely responsible for paying the network fee, which adds a mandatory signature to the transaction for it to be valid: the signature of the gas payer. In this scenario, the transaction would carry three signatures in total (One signature from each of the two wallets sending USDC, plus one from the wallet that is paying the blockchain fee).
This exact same mechanism is what we use for consolidation.
The problem we face is that the intermediary wallet holds the tokens (for example, 100 USDT) but doesn’t have any SOL, meaning it cannot pay the blockchain fee to send them.
To solve this, we construct a single transaction that contains two instructions:
- One instruction to send 99.9% to the store’s master wallet.
- Another instruction to transfer the 0.1% fee to our wallet (our commission).
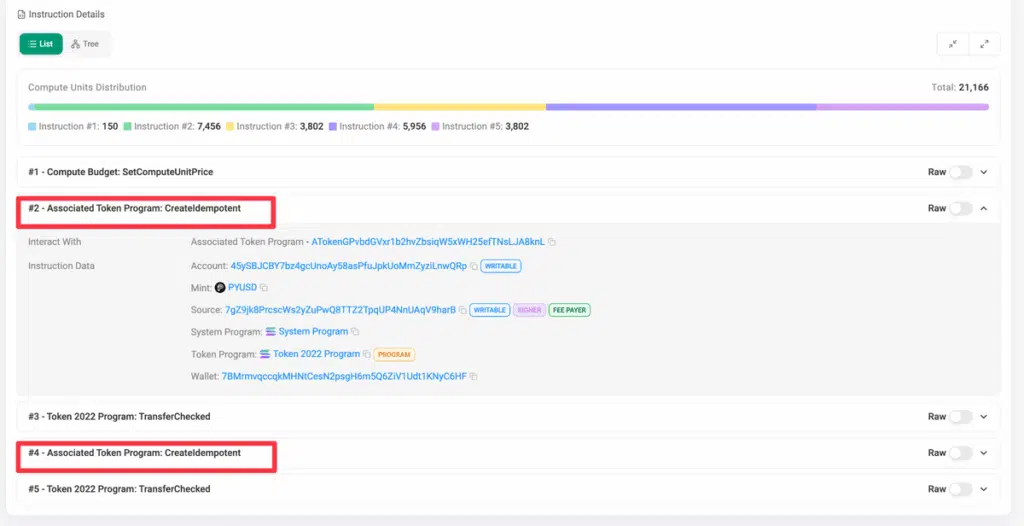
This image shows a real consolidation transaction. It is a transaction made up of 5 instructions.
Instruction #3 is where we transfer 99.9% of the tokens to the store, and instruction #5 is where we transfer the 0.1% fee to our wallet.

Since the intermediate wallet doesn’t have any SOL, we include in the transaction the signature of another wallet that holds a SOL balance and acts as the Fee Payer (the one responsible for paying the network fee on Solana).
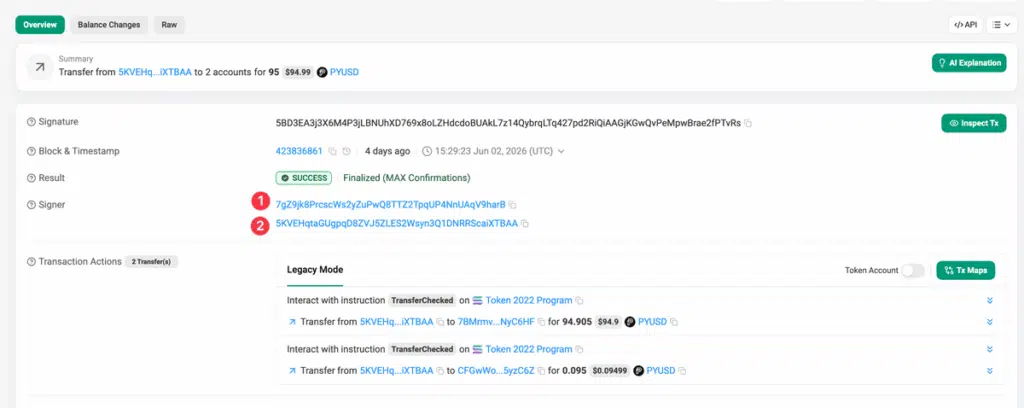
The image above shows the same transaction as before. It is a two-signer transaction.
- The first address that signs a transaction in Solana is always the one that pays for gas; in this case, address 1 (7gZ9…) is the one that paid the blockchain transaction fee.
- Address 2 (5KVE…) is the one that held the PYUSD and signed the authorization to move them. In this case, we are sweeping a PYUSD payment.
Just as we have 2 signers, we have 2 resulting signatures. You can see the original signatures in the “raw” section of the transaction, which is what is actually sent to the blockchain.
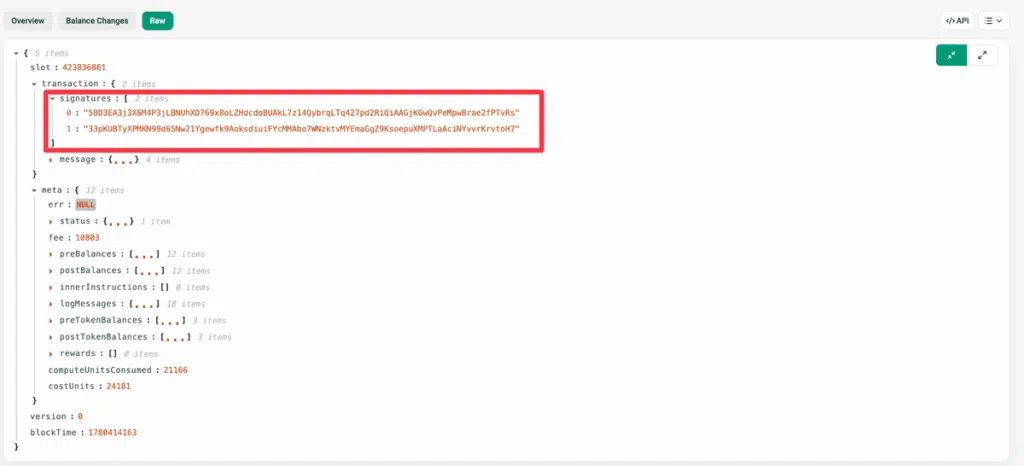
When a transaction has more than one signature, the order matters. The first signature always belongs to the address that pays for the gas (the Fee Payer). In Solana, this first signature also serves as the transaction hash, the unique ID used to identify the transaction on the blockchain.
The second signature belongs to the intermediary wallet, which held the PYUSD and authorized the movement of the funds.
This way, the intermediary wallet signs to authorize the departure of its tokens, and the Gas Tank signs to pay for the operation’s gas. Thus, with a single multi-signature transaction and in a completely native way, we consolidate funds efficiently.
If you want to dig deeper into the mechanics of Solana transactions, you can read more in this article: Deep Dive Solana Transactions.
Tron Consolidation
Tron’s mainnet launched in 2018 as an alternative to Ethereum with much lower fees. Its virtual machine, the TVM (Tron Virtual Machine), was built to be compatible with the EVM and uses the same instruction set and execution model, so most Solidity contracts can run on Tron after being recompiled. It isn’t 100% identical, though: the TVM uses an Energy model instead of gas, and a few opcodes behave differently.
Paradoxically, Tron went from being one of the cheapest blockchains on the market to becoming one of the most expensive. Despite this, it still processes an enormous volume of transactions, since it’s one of the most widely used networks for USDT, with especially strong adoption across Asia.
Bandwidth and Energy vs Gas
Unlike most chains, Tron does not use the classic gas model to cover network costs. Instead, it relies on two native concepts: Bandwidth and Energy.
- Bandwidth: This is consumed every time you send a transaction on the network. Each Tron address gets 600 free Bandwidth units per day.
- Energy: This is consumed exclusively when you interact with a smart contract.
For example, if you send TRX (the network’s native token) to another address, you only consume Bandwidth.
However, sending USDT requires interacting with the token’s smart contract, so it consumes both Bandwidth and Energy. If your wallet doesn’t have enough of either resource to cover the transaction, the network burns TRX directly from your balance.
You can obtain both Bandwidth and Energy by staking TRX. In fact, this is what most exchanges do. The problem is that nowadays the requirements are very high: you need to have around $3,000 worth of TRX frozen in staking just to get the necessary energy for a single free USDT transaction per day.
For us, keeping that much capital locked up on the blockchain is unfeasible. The good thing is that the Energy and Bandwidth obtained from staking can be delegated to other addresses.
There are external providers in the market that rent out these network resources. This is key because if you do not have accumulated Energy or Bandwidth, the cost of processing the transaction by burning TRX directly from your wallet is prohibitive.
The Consolidation Flow and the Need for Orchestration
On Tron, there’s no way to bundle multiple operations into a single transaction natively. Unlike EVM chains, Tron doesn’t support EIP-7702, which would let a regular EOA temporarily act as a smart contract and run the batch on the fly.
Without it, an intermediary wallet would have to be a smart contract just to send the fee and sweep the funds in one transaction, and deploying a dedicated contract for every wallet would be prohibitive. As a result, we consolidate funds on Tron in four steeps:
- We rent the Bandwidth needed for the transfers by calling our external provider’s API.
- We rent the Energy needed for the smart contract interaction from that same provider.
- We execute the transaction to collect our fees (we take 0.1% of the payment plus the cost of renting the energy).
- We execute another transaction to send the remaining funds to the store’s master wallet.
This is where the need for an orchestrator comes in. Since we depend on external services and multiple consecutive transactions that are not atomic, a failure halfway through leaves you in an inconsistent state (for example, if we rent the energy but the token transfer fails).
To orchestrate this flow, we tested several frameworks on the market, but we didn’t like any of them: they were either too verbose, the documentation was poor, or they required too much implementation time. We couldn’t find any orchestration library for NestJS that convinced us.
Ultimately, we decided to solve it using jobs with BullMQ.
For EVM and Solana consolidation, we also use BullMQ, but the logic there is very straightforward because the operation is atomic (either the transaction hits the blockchain or it fails, there is no middle ground), so configuring a couple of retries is enough.
On Tron, we set the BullMQ Job retry count to 0 and, if the job fails, it triggers an alert in our system so the team can review and resolve it manually.
For now, this system with BullMQ is working perfectly for us, especially since the payments we process through Tron do not represent a massive volume compared to other networks.
However, we know that in the future we will need to implement a real orchestration layer, not just for Tron, but to manage other complex flows in the system. We will likely write another article down the road explaining how we solved it.
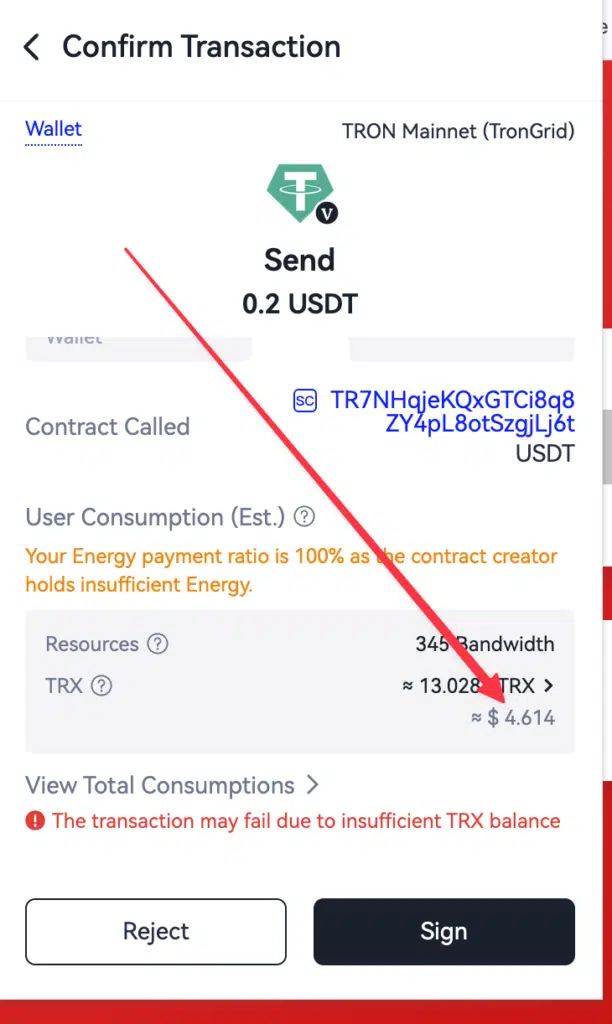
When I said Tron has become expensive, this is what I mean. Sending a USDT transaction from a wallet with no energy costs around $4.60.
By renting the energy instead, we bring that down to roughly $2 for a single transaction, which is still a lot compared to other blockchains, where the same transfer often costs just a few cents.
alt=”Tron wallet showing about $4.61 in network fees to make a single USDT transfer from a wallet with no Energy, a sign Tron is no longer the cheapest chain.”
Bitcoin and Litecoin
Bitcoin and Litecoin (a Bitcoin fork) don’t require consolidation. Because these networks have no tokens, only a native cryptocurrency, fees are paid directly in it.
How We Accept Bitcoin and Litecoin Payments Without Building Everything From Scratch
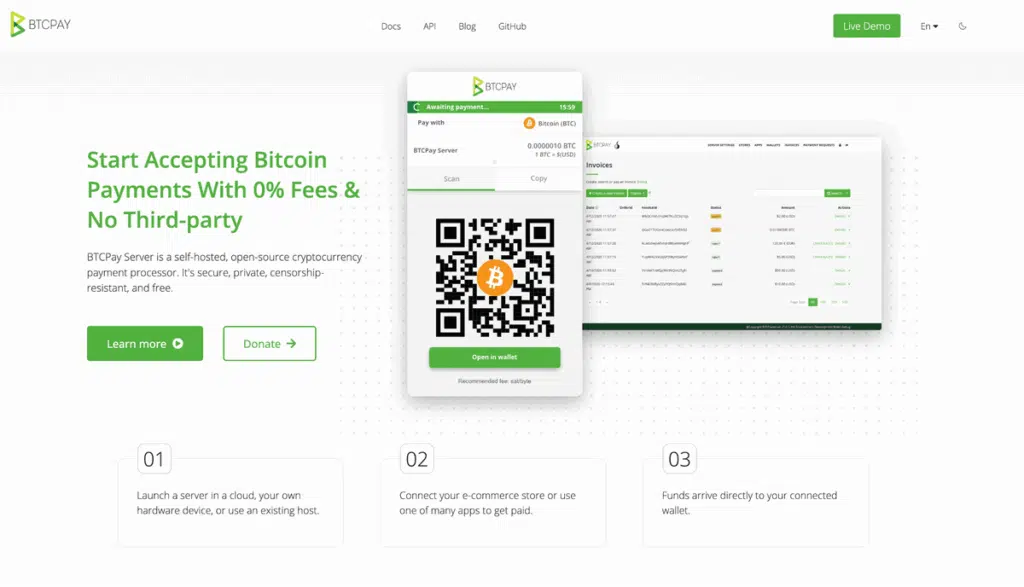
To process Bitcoin and Litecoin, we use BTCPay Server as a microservice, an open-source, self-hosted payment processor with 0% fees.
Relying on BTCPay Server has saved us from developing the entire logic to accept Bitcoin or Litecoin payments from scratch (payment confirmations, webhooks, address generation via XPub, etc.).
Each store in our database is linked to a store in BTCPay Server. We use BTCPay Server in headless mode: we generate orders through its API, and it returns the deposit address that we then display to the user to make the transfer.
Lightning Network Handling
The Lightning Network also doesn’t require consolidation, since it has no tokens, only Bitcoin.
Lightning Network operates through liquidity channels. When running a crypto payment gateway, it is mandatory to always have inbound liquidity towards our node; if this is lacking, the merchants and stores using our service cannot receive payments.
This represents a constant problem, as it forces us to always be attentive to rebalancing channels, in addition to the continuous technical maintenance that running your own node requires.
To avoid these drawbacks, we use a method that lets us receive Lightning Network payments without managing liquidity ourselves, allowing us to process an unlimited volume of payments.
So how do we do it?
We use Boltz, a non-custodial Bitcoin bridge that works through atomic swaps.
An atomic swap is an exchange that either executes completely for both parties or does not happen at all. This is what makes them so valuable: thanks to the underlying math (cryptography), it is impossible for either party to suffer fraud or lose their funds mid-process.
The atomic swaps we perform go from Lightning Network to Liquid Network, a Bitcoin sidechain. The process works as follows:
- When someone wants to pay on our gateway, our system calls the Boltz API to create the swap.
- We provide Boltz with a Liquid Network address that is directly linked to the merchant’s store, and they hand us a Lightning invoice.
- We show the user that exact same invoice returned by Boltz; the moment they make the payment, the atomic swap executes instantly.
We don’t keep the funds in the Lightning Network because, as I mentioned earlier, Lightning is hard to manage, so we bridge the funds to the Liquid Network, which is cheaper and faster than Bitcoin L1.
The Lightning Network is a Bitcoin Layer 2, while the Liquid Network is a Bitcoin sidechain. The main difference is that a Layer 2 batches its transactions and posts them to the L1, inheriting its security, whereas a sidechain is a separate blockchain with its own rules, connected through a bridge, and does not post its transactions to the L1.
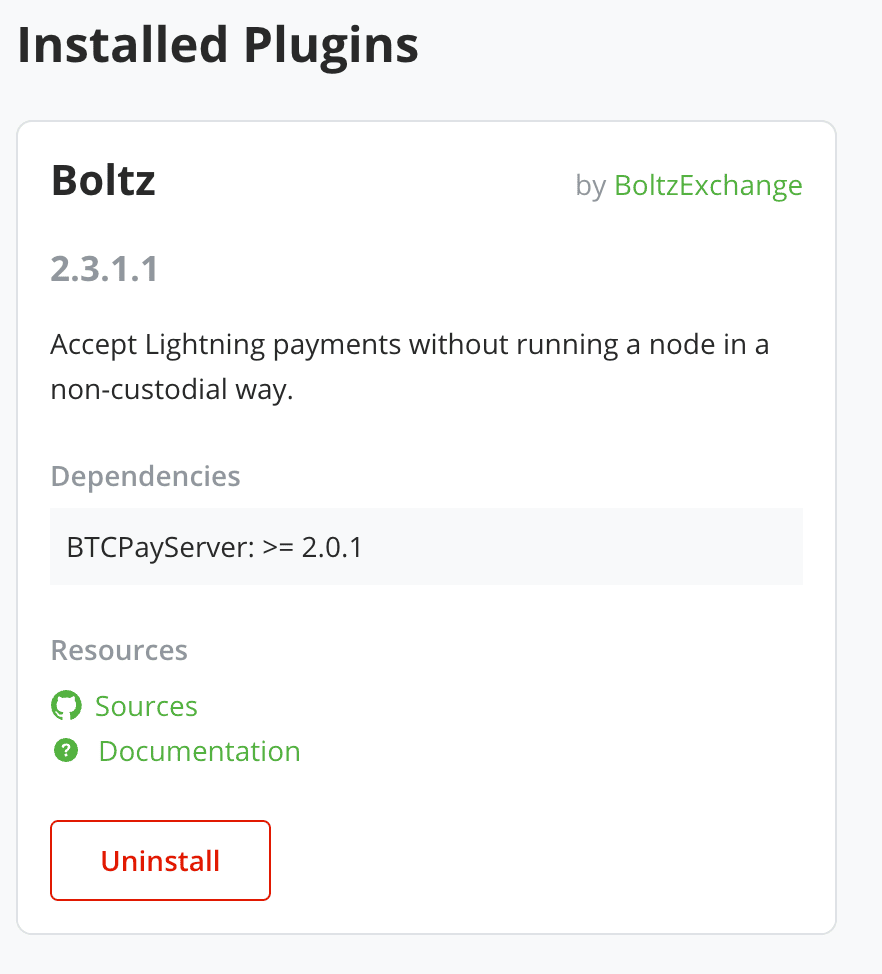
To process Bitcoin and Litecoin we use BTCPay Server, and we use it for Lightning as well. Boltz has a plugin for BTCPay Server that abstracts the complexity and handles the swap directly and natively. This has saved us a lot of time and allowed us to integrate the entire system extremely quickly.
The only downside to this architecture is that, because there are multiple intermediaries connected (our backend communicates with the BTCPay Server API, which in turn calls the Boltz API), server response times take several seconds.
In other words, when a user clicks the pay button, it takes a moment to generate the invoice.
This is a trade-off that we are currently willing to accept because of the integration speed we gained and because the volume of users paying via Lightning is not massive.
For providing this bridge and atomic swap service, Boltz charges a 0.25% fee. Therefore, to cover this cost and maintain profitability, we apply a final fee of 0.35% on Lightning payments, adding our own 0.1% margin.
The fact that we don’t manage the liquidity doesn’t mean nobody does. We rely on Boltz to manage it for us: they have a specialized team dedicated exclusively to this, backed by infrastructure developed over several years, so they handle liquidity far better than we could. The trade-off is that we depend on them, which means that if they don’t manage the liquidity well, our Lightning payments can go down.
Reusing Intermediary Wallets: The Trick to Save on Blockchain Hidden Fees
We process thousands of checkouts a day. On most blockchains, we reuse the intermediary wallets we use to receive funds. In addition to optimizing our database (otherwise we would end up accumulating millions of wallets), we do this for a specific reason unique to each network.
EVM Chains: Killing the EIP-7702 Setup Costs and Token Storage Fees
On EVM chains, we reuse intermediate wallets to save gas. The first time a wallet receives a specific token, the transaction consumes more gas to initialize its storage slot in the token’s smart contract. Additionally, the first time a wallet goes through the EIP-7702 flow, it incurs a higher cost to delegate the EOA’s code to the implementation contract.
By reusing wallets that have already received that token and have already completed the EIP-7702 setup, the user who pays saves that extra gas. Furthermore, it also saves us gas during funds consolidation, since the EIP-7702 delegation is already done.
Solana: Stopping Users From Paying the “$0.20 Rent Tax”
In Solana, your main wallet can only hold SOL. Tokens do not live directly in the main wallet address (the account controlled by a private key). Instead, they are stored in a specialized account called an Associated Token Account (ATA).
If a wallet has never received a specific token before, its corresponding ATA does not exist yet. Because of this, the sender must pay SOL to create the account during the transaction, otherwise the transfer will fail completely.
Creating an ATA requires allocating blockchain storage, which costs a rent deposit of ~$0.20 in SOL.
If a new intermediate wallet were assigned to every checkout, every paying user would be forced to cover this $0.20 cost out of pocket to create the intermediate wallet’s ATA.
To avoid this, intermediate wallets are reused. A user will only have to pay the blockchain fee to create the ATA if the checkout is assigned to an intermediate wallet that has never received that specific token before.
Here is an example of how a USDT ATA address appears on SolScan:
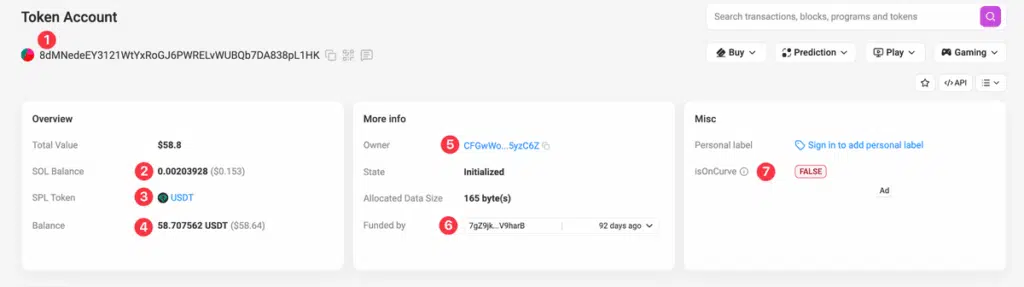
- ATA Address: The unique public address of the Associated Token Account itself.
- Rent Fee: The storage deposit in SOL required to open and maintain the ATA.
- SPL Token: The specific asset managed by this ATA (in this case, USDT).
- Token Balance: The current amount of the token held inside this ATA.
- Owner Address: The main wallet address (the one managed in apps like Phantom or Solflare) that controls this ATA and holds the private key.
- Funded By: The address that paid the SOL transaction fee to initialize the ATA.
- Is On Curve: A value of No means this address does not have its own private key. A normal wallet address shows Yes because it is controlled directly by a private key. An ATA shows No because it does not have a private key, it is controlled entirely by the main owner address instead.
Let’s take a look at this consolidation transaction (99.9% to the master wallet and 0.1% to us). Because there are two recipients, it includes two independent create_ata instructions that check whether their Associated Token Accounts exist, initializing them and paying the SOL rent only if they are missing.
Tron: Reusing Wallets to Avoid Paying Double for USDT Energy
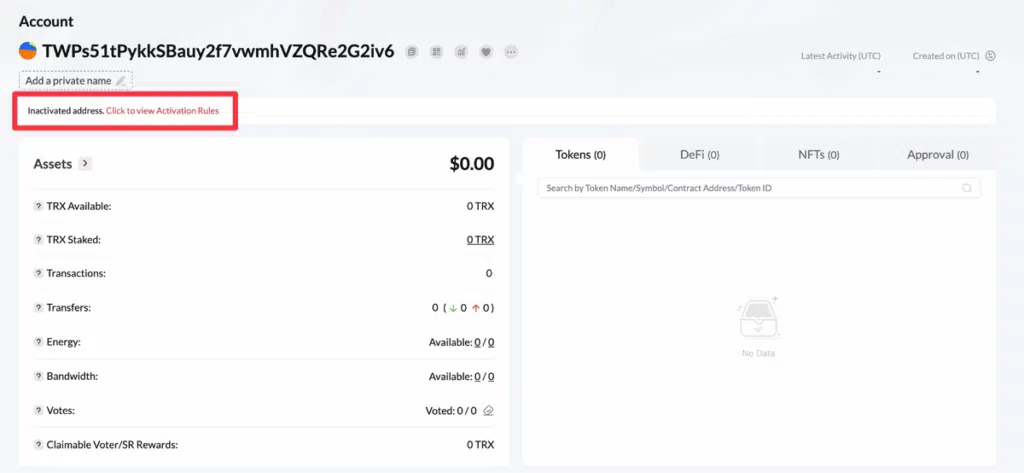
On Tron, intermediate addresses are also reused. Any Tron address can receive tokens, but the address must be “active” before those tokens can be transferred out.
Activating a new address costs ~$0.35 (1 TRX). This activation only needs to happen once per address.
Unlike Solana, this 1 TRX fee is non-refundable. We pay this cost ourselves, because otherwise we simply cannot move the funds. To activate these addresses, we use the same API we use for tron renting bandwidth and energy.
Below is an example of an inactive Tron address on TronScan.
Additionally, within the TVM (Tron Virtual Machine), just like in the EVM, the first time an address receives a token like USDT, the smart contract must register that address for the first time and allocate a slot in its database (its storage).
On the Tron network, writing this new data to the blockchain is significantly more expensive and literally doubles the transaction cost. If we didn’t reuse these intermediary wallets that are already registered in the USDT contract, users would have to spend much more energy or TRX out of their own pockets simply to send the funds to our intermediary wallet.
Bitcoin & Litecoin: Why We are Forced to Generate New Addresses Every Time
For Bitcoin and Litecoin, we don’t reuse addresses since we use a BTCPay server, and BTCPay does not reuse addresses. Each store has a different xPub associated with it, so a new address is created for every checkout.
Lightning Network: One-Time Invoices
For the Lightning Network, wallet addresses don’t even exist. Instead, everything works with invoices. An invoice is just a single-use payment request. Once it gets paid or expires, it is gone forever, so we never reuse them.
Conclusion
Crypto payments look easy from the outside, but a lot happens behind the scenes. While merchants just use our API and get webhooks, we do all the heavy lifting in the backend, tracking wallets, monitoring blockchains, moving funds..
Zeno Bank is a crypto payment gateway that will become a crypto-friendly bank in the future. We are looking for top-tier engineers to join us.If you want to be part of a Tier A team and grow as a software engineer working with us, we would love to hear from you. Reach out here: https://zenobank.io/contact